We’ll outline how to start a blog for beginners below. Our step-by-step guide will help you create a blog that can make money and establish you as a leader in your community!
We started our first website in 2011, and I only wish we had learned how to start a blog earlier. It really is easier than you think to set up, and with time and commitment, you can make money through blogging!

Our How to Start a Blog Guide also includes: how to pick a host, how to install WordPress, and how to create your first pieces of content even if you have little to no experience in blogging.
Why Create a Blog?
We started our first blog, Sorey Fitness, in 2011 to share our passion of healthy living. It also allowed us to establish ourselves as leaders pretty quickly!
There are dozens of reasons to learn how to start a blog though!
Blogging allows you to:
- attract people to your content and passion
- position yourself as an expert in your community
- share your passions and life with others online
- make money through creating content
- grow your social media channels
- generate excitement about new products and opportunities
And unlike social media, you will own your platform with a self-hosted blog. This means you don’t have to worry about algorithms changing or being the first on the next big social network.
Since the Internet started, people have searched for topics and used their email to connect with others. Learning how to start a blog will allow you to tap into both of these things!

Why Use Our How to Start a Blog Guide?
Anyone can create a blog, and anyone that does could turn around and write about how to start blogging.
Some actually do this because of the affiliate income associated with it! But, we’ve been blogging since 2011 and have had over 10 million page views on our blogs. We’ve also created 2 full-time incomes from our blogs and from the opportunities they’ve brought us.
I don’t say that to toot our horn but to let you know that we do know what we’re doing. In the beginning, we had no idea how to start a blog. Also, we weren’t tech-pros or someone with a big budget. We had to learn how to blog on our own, and now we’re sharing what has worked so well for us.
Can I Start a Blog for Free in 2022?
If you’re just starting to research how to start a blog, you might be wondering why pay to blog when there are free options out there.
If you’re looking to just have a space to share updates with family and friends or write as a hobby, you can blog for free on Tumblr or Blogger.
With that said, if you’re looking to make money blogging or create a business with your blog, a free option isn’t the best choice because most free options don’t allow you to monetize your content.
Even if you don’t know if you will try to make money in your first 6-12 months, I still recommend a self-hosted site like I’ll show you how to set up below. The reason? It can be a pain to move your content over to a self-hosted site from a free one.
With a self-hosted site, you’ll….
- have more customization over how your blog looks.
- be able to monetize your site with ads, sponsored work, and more income opportunities.
- avoid having to switch from a free service to a self-hosted one.
- have access to support if something goes wrong.
- be able host giveaways.
- own your blog.
The worst thing about a free blogging service is that it can disappear overnight. Tumblr or Blogger could just say, “we’re wrapping this thing up!” and all of your content would be gone!
It’s also very affordable now to create a self-hosted blog. So you won’t be out an arm and a leg to get started!
So let’s get started!
How to Start a Blog in 2022
Below we’ll outline each step to help you create a blog that can make money!
1. Decide What Your Blog Will Be About
Before you start driving somewhere, you typically know where you are going. So as you learn how to start a blog, it’s important to know why you’re creating it in the first place.
What will you share? What are you passion about?
If you’re unsure about what your blog should be about, ask yourself:
- What do people ask you about?
- What do you like to talk about?
- Who do you want to help?
Once you know these three things, you’ll be able to start digging into your niche deeper and find your writing style.
Knowing what you’ll blog about or who you’re talking to will also help you create meaningful content.
Ask yourself, what is something my audience needs to know or needs help doing? List 5 things before moving on.
Finding Your Niche
Get as specific as you can because it will help you connect with your readers and reduce your competition as well. This will be your “niche”.
Your niche could be a specific topic or a certain group of people you want to help.
Typically, Readers Want You To:
- help them solve a problem
- teach them something new
- help them hit a new goal
- entertain them
If your blog can help them transform in any area of their life, that will also serve you very well!
Narrowing Down Your Topic
Some people suggest being super specific because it’ll be less competition and bring your specific audience to you. For example, if you want to blog about dogs, you may narrow that down to “small dogs” then narrow it down even further to “small rescue dogs” or even “Shih Tzus rescue dogs.”
Another example could be that you want to start a healthy recipe site. You may choose to only do healthy recipes that are completely from scratch or healthy recipes that only take 20 minutes to make.
The benefit of a niche is you can establish your expertise and develop your own little piece in the market.
But beware-
The downfall of being so specific is that you can paint yourself into a corner. If you feel passionate about healthy recipes and want to write about all different kinds (vegan, low-carb, 20 minute meals, etc) go with that.
In my opinion, it’s better to have a topic you can write about for years to come versus having a super narrow topic you’re bored with in 6 months.

2. Choose a Blogging Platform
A blogging platform is where you’ll write your blog. We love WordPress.org. It’s very user-friendly and offers a lot of cool features! Please note this is WordPress.org versus .com.
We Love WordPress.org because it:
- is very user-friendly even for beginners.
- offers a ton of customization.
- allows you to make money blogging.
- is optimized for search engines.
Other platforms would be like Square, Wix, or Blogger. These just don’t offer the same functionality in our opinion as WordPress.
3. Set Up Your Blog Hosting and Domain Name
In order for people to find your blog, you’ll need a host. Your host keeps your content safe and secure and allows your readers to be able to view all of your content.
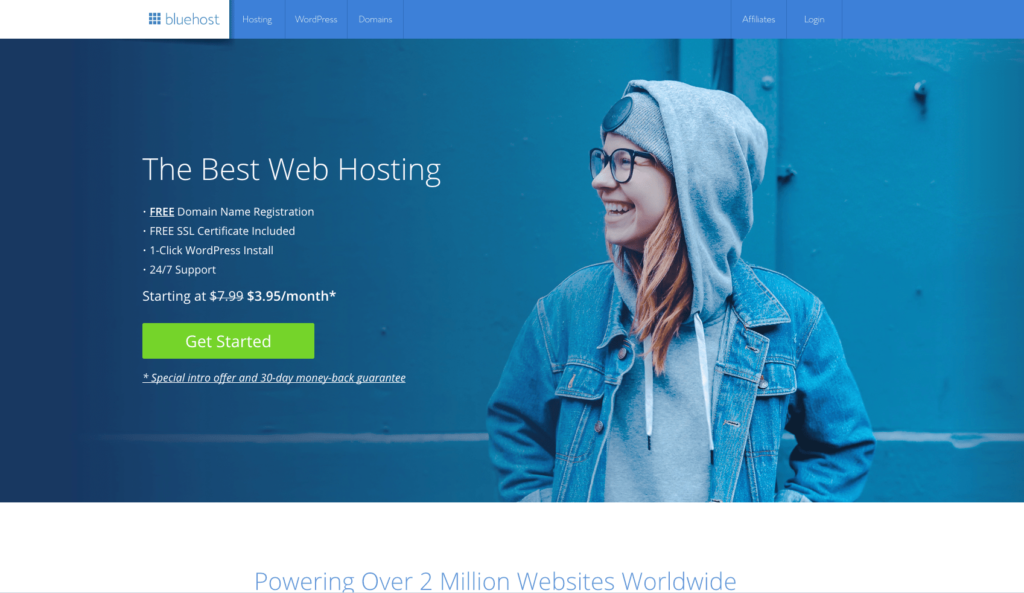
As you get started, BlueHost is a great choice for a host!
BlueHost:
- is very affordable at $3.49 a month
- offers great tutorials
- provides customer service chat, email and phone options.
- includes a domain name with your purchase
- is recommend by WordPress
- offers a 30-day money-back guarantee
- is reliable and has been around since 2003!
They also allow you to use an existing domain name if you already own one.
Great, but What’s a Domain Name?
A domain name is the web address you and your readers put in to access your blog, like Google.com or KimandKalee.com.
Here a few best practices to choosing a domain name:
- Choosing a .com versus another option like .net or .us is ideal
- Before picking a name, Google and see what results pop up. This will help you see if something similar is being used or if the name fits the end goal you’re going for.
- Keep your domain name simple and easy to remember. If possible, avoid long words, numbers and symbols.
- If you’re struggling to find an available domain name, consider using your own name.
Setting Up Your BlueHost & Domain Name
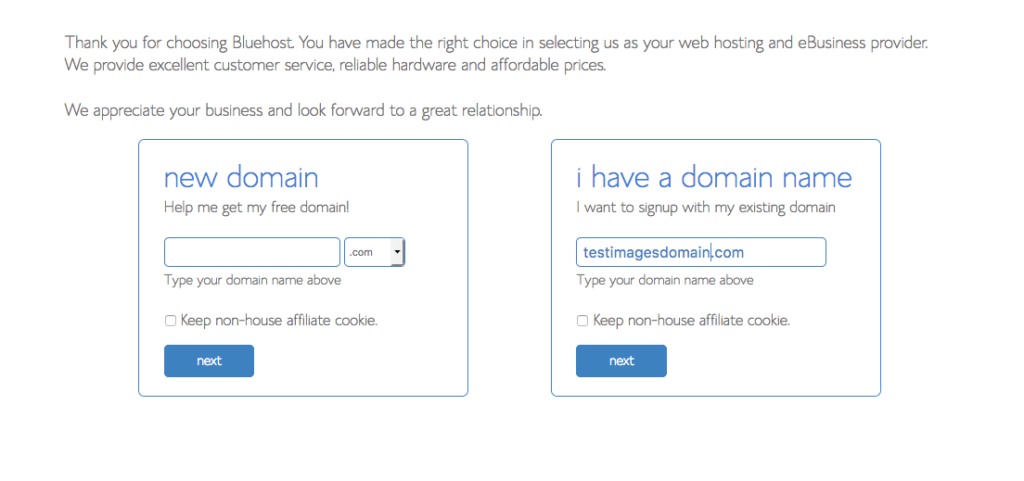
1. Click “Get Started” on BlueHost & Choose Your Package
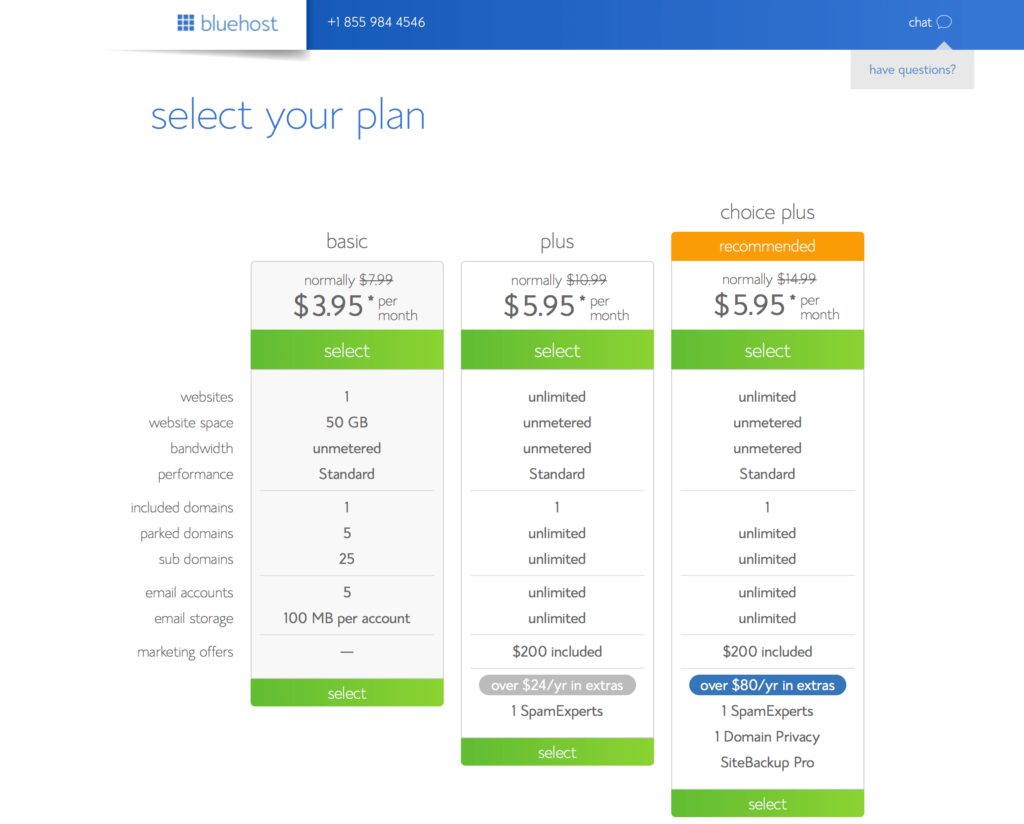
I suggest choosing one of the unmetered, unlimited options if you can afford it. The Domain Privacy feature is worth it to me because it keeps your personal contact information private from the public.
Enter In Your Domain Name
After choosing your plan, you’ll be asked to put in a domain name. This again is your web address like KimandKalee.com.
Create Your Bluehost Account
Here you’ll enter in your information.
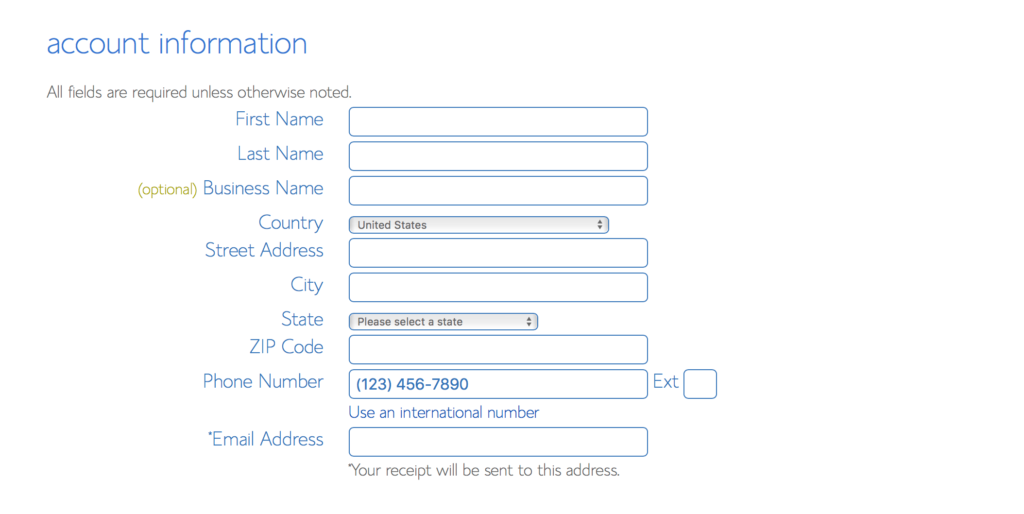
You’ll also be asked to confirm your package and select how many months you’d like to buy.
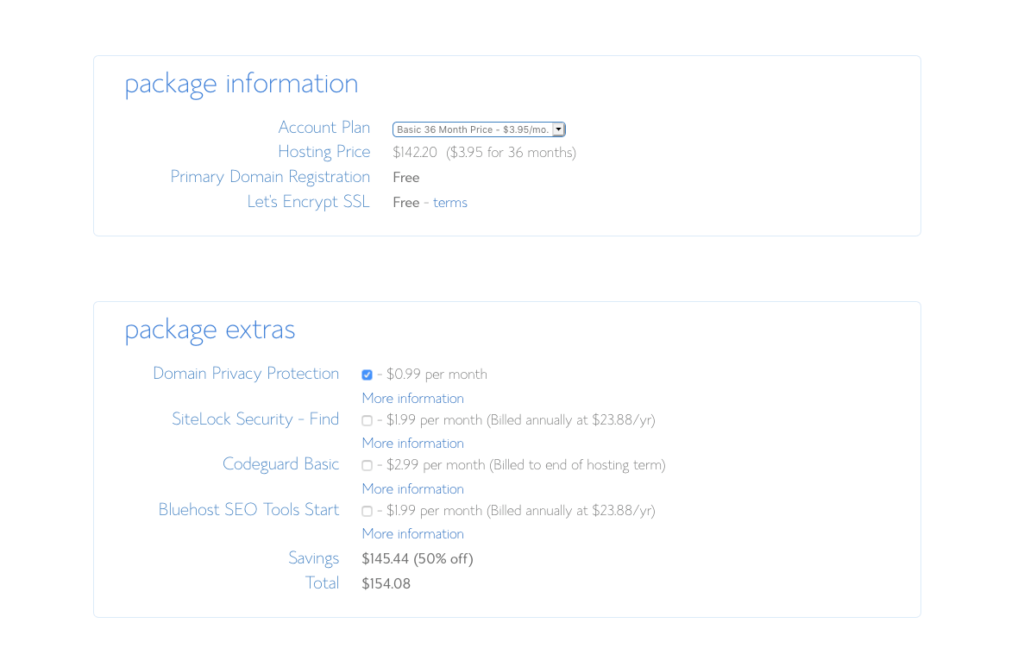
Bluehost does make you pay in advance, and your price is locked in for as long as you choose. For example, if you pick 2 years, your price is locked in for 2 years.
The Extras
I would personally skip the all of the extras except for the Domain Privacy Protection which keeps your personal contact information private.
Then you’ll enter your billing information and click submit.
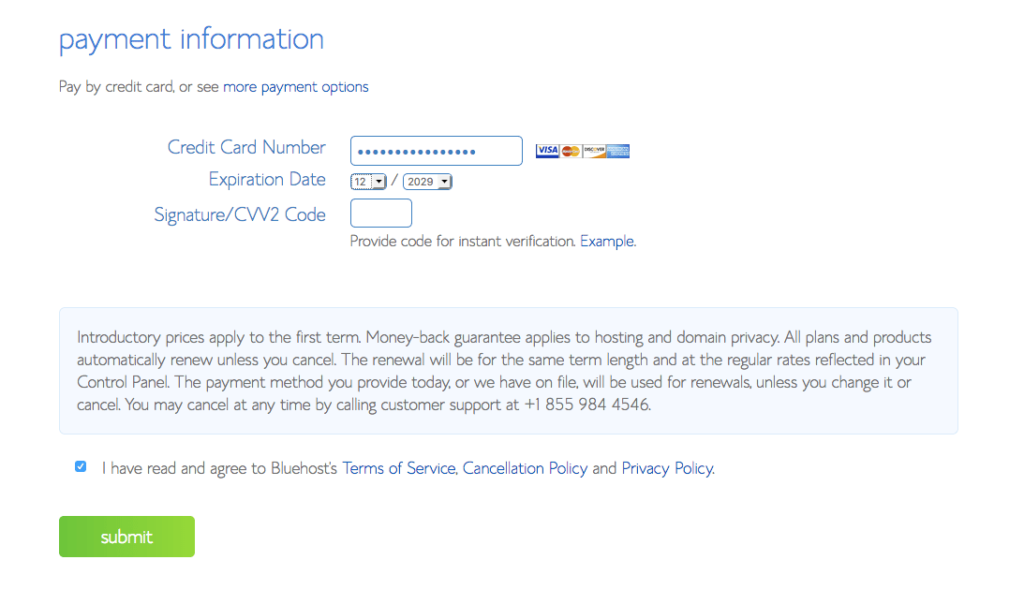
You can skip the other offers
After you click submit, it’s going to offer you a bunch of additional offers. I just click “no thanks”.
Then, you’ll set up your password for Bluehost!
This is only your password to Bluehost and not your WordPress blog password.

Your Bluehost password should be hard to crack and make sure to you don’t forget it. You’ll need it in a minute.
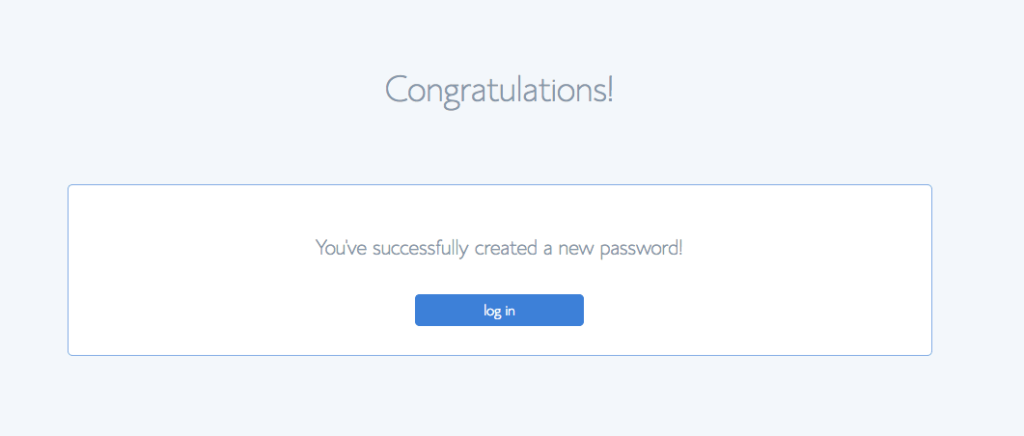
Click the login button and login.
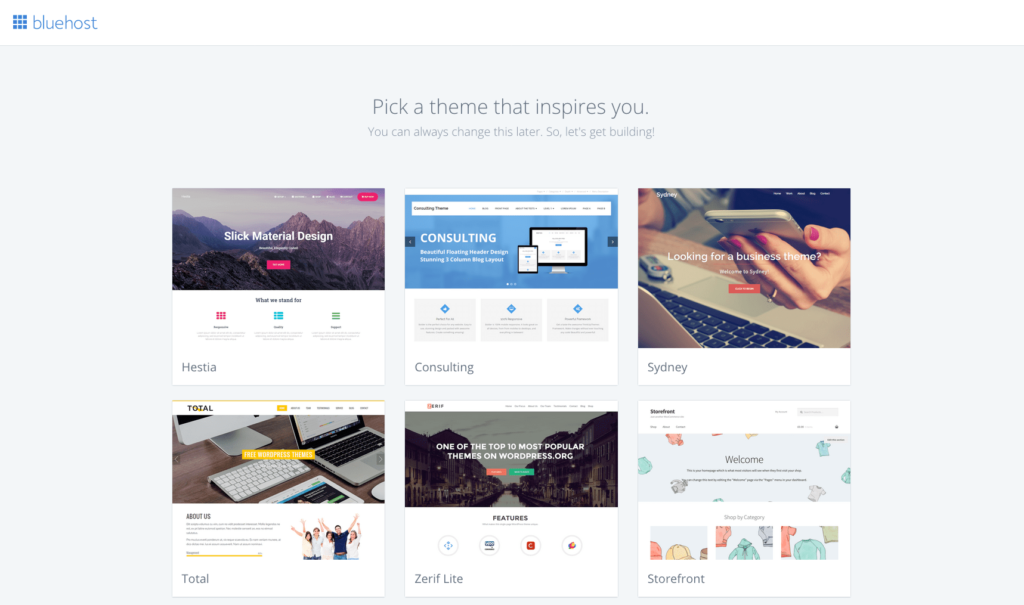
We’re almost there. You can skip all of the free themes it offers.
The reason is you’ll have a free theme when you login to WordPress already, and you can always add a new theme later.
A lot of themes they offer can be buggy because they aren’t updated often. So your best bet is to skip these.
Finding Your Site
On the next screen, you may see a notification saying your site is on a temporary domain. Don’t worry – this is normal.
It can take up to 24 hours for a new domain to be fully registered. Once it is, Bluehost will automatically update it for you.
If you already had a domain, you can set it up when you are ready.
But now – we’re ready to start working on our site!

WOO WEE!! You did it! That was the HARDEST part!
You just DID that! Give yourself a pat on the back!
You’ve done the heavy lifting, and the hardest part is over!
Now, you have a Bluehost account and WordPress is installed (this was done automatically).
While these 2 things work together, they both have a separate login.
- To login to your host, go to Bluehost.com and click the Login link in the top right corner.
- To log in to WordPress, go to yourdomain.com/admin.
- You’ll typically login to WordPress from here on out.
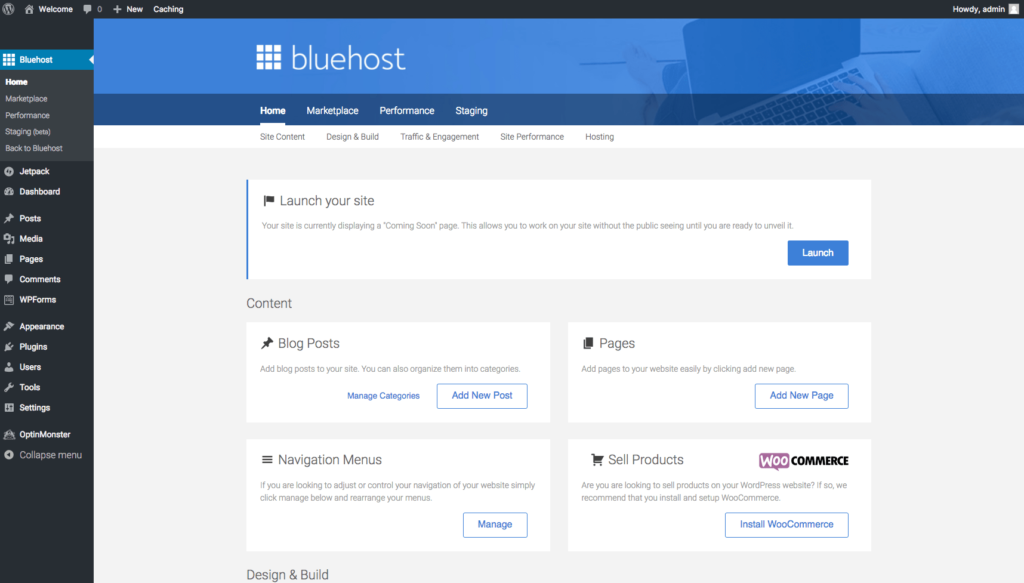
From now on, you can type in your domain name into the search bar and see your site! It may show a “Coming Soon” page if you’re not logged in.
The next step is to click “Start Building”

Login and start looking around WordPress!
4. Logging into WordPress
To log into WordPress, you’ll go to yourdomain.com/admin.
This is what your dashboard will look like.
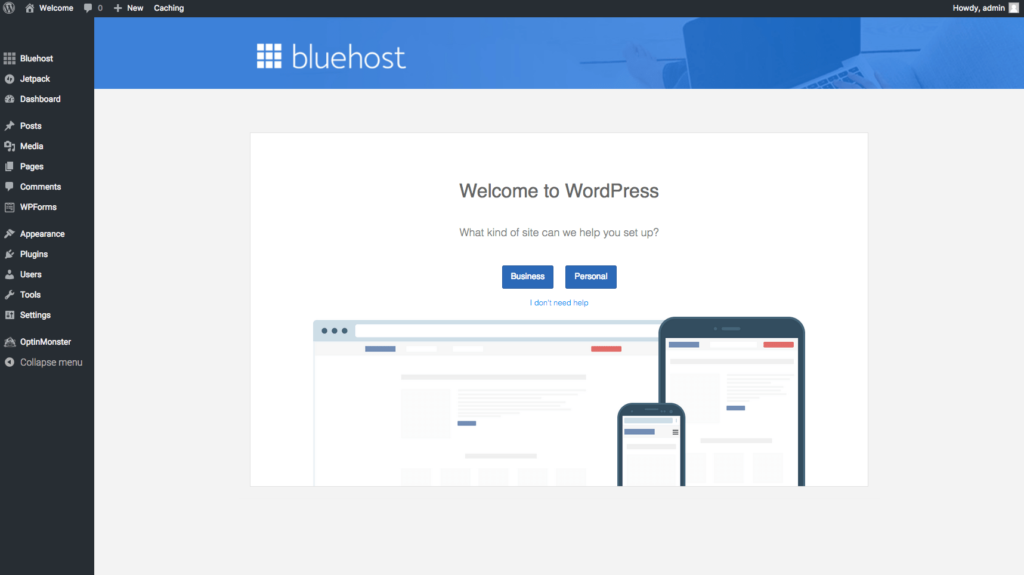
This is the behind-the-scenes part of your blog where you’ll spend most of your time. You’ll be able to change what your site looks like and publish posts and pages from this dashboard.
You’ll notice there is a WordPress Wizard to walk you through the set-up. You can use this or continue to use this guide.
5. Make Suggested Changes Under General Settings.
You’ll see settings on the lefthand side. Just click General to get started.
-Customize Your Site Title & Tagline
WordPress puts in default information here, so you can change it to be more you and your brand.
Your site title may be your domain name just without the .com. Like Kim and Kalee.
Your tagline will be like your motto or what your site is about. Example: Living Healthier & Happier! or Nike’s “Just Do It” is a tagline.
-Make Sure an Email is Listed Under General
It should have your email already, but it’s always good to double check.
You can also update your timezone under General Settings if you’d like. Then, you’re all set there!
-Now it’s time to delete the default sample posts and pages.
You’ll notice WordPress gives you a couple sample posts and pages. It’s totally fine to delete those!
6. Add Plugins to Help You Get Started
Plugins allow you to customize your site and add even more functionality. You don’t need or even want to have a ton of plugins because they can weigh your site down, but a few plugins can do wonders for your blog!
We personally recommend installing:
- WordPress’ Jetpack – Tracks traffic and offers additional tools on WordPress.
- Yoast SEO – Offers a writing checklist to help you optimize each of your posts for search engines.
- Askimet Anti-Spam – If you pay for Askimet (about $5 a year), it’ll automatically sort spam comments to your spam folder.
- Autoptimize – It can help you improve your site’s speed without having to learn a lot of technical skills.
Installing plugins on WordPress is super simple to do, and all of these plugins are currently being supported.
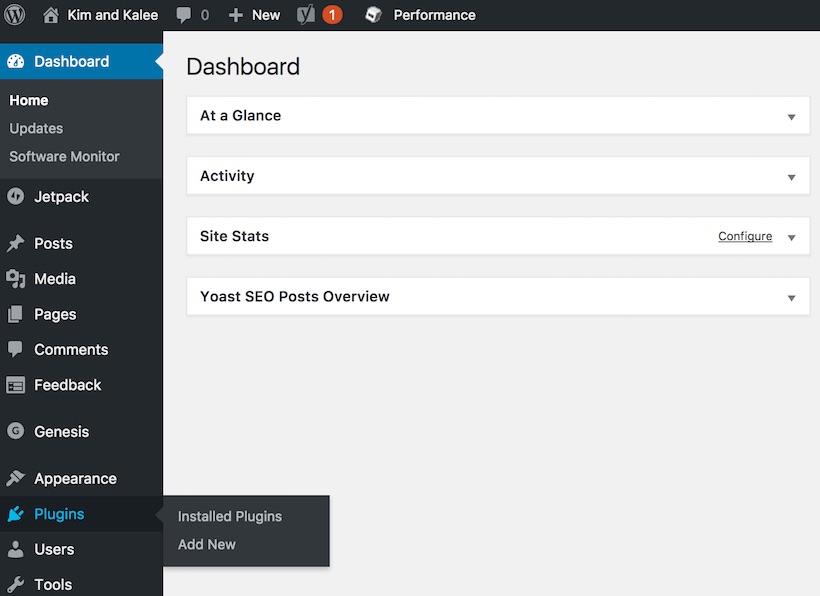
How to Install a Plugin
- Click “Plugins” then “Add New”
- If you know the name of the plugin, you can search for it in the top right.
- Choose the one you want and click “Install Now”
- Once it’s installed, click Activate.
- Then go to “Installed Plugins” to set up any plugin settings. Some don’t require any at all!
7. Get a Mobile Responsive WordPress Theme
Now is when you get to decide on what you want your blog to look like!
In order to set up the functionality and layout of your blog, you’ll need a theme. While WordPress offers some free options, I highly recommend using a Genesis framework and theme available on StudioPress.
They are coded well which means you’re less likely to run into a technical issue, and they allow for a ton of customization to make it look just like you want it to!
They’re also very affordable and offer a variety of pretty and professional designs.
Why Choose a StudioPress Theme?
- Optimized for search engines
- Affordable
- Easy to use
- Mobile responsive options
- Includes set-up guides
- Much cheaper than a web designer
We Love These Themes
View All StudioPress Themes
Each StudioPress theme includes the Genesis Framework and Child theme you choose like Wellness from above. You’ll need to download both files.
Genesis Framework is like your house’s foundation, and the Child theme is like your paint colors and furniture.
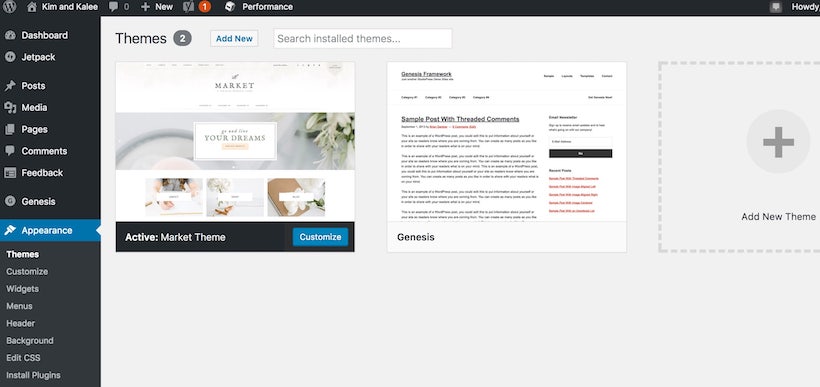
Here’s a step-by-step guide on how to install both pieces.
First – Install the Genesis Framework (aka Parent Theme)
- Go to your WordPress dashboard
- Go to Appearance -> Themes
- Click Add New button towards the top of the screen
- Then, click Upload Theme button towards the top of the screen
- Click Choose File
- Select the Genesis zip file from your computer
- Click Install Now
- Then click Activate
Second – Install the Genesis Child Theme (Wellness, Refined, etc)
- Go to your WordPress dashboard
- Go to Appearance -> Themes
- Click Add New button towards the top of the screen
- Then click Upload Theme button towards the top of the screen
- Click Choose File
- Select the child theme zip file from your computer
- Click Install Now
- Then click Activate
Each theme includes a set-up guide that walks you through how to customize it as well.
You can start customizing your blog by going to Appearance then Customize.
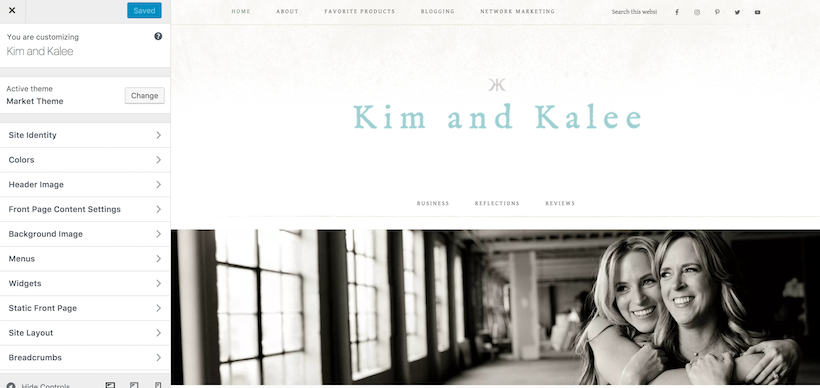
If you’re not really sure how to customize it, you can hire someone off of Upwork or Fiverr to make these small changes for you for under $100 typically.
8. Set Up Your Permalinks
Permalinks are how your blog’s URLs are organized and presented to readers. You want to change this BEFORE publishing any content.
The permalink should explain what you’re talking about and be brief.
By setting up your permalinks in the right way, you’ll also add another layer of search engine optimization (SEO) to your new blog.
Changing Your Permalinks
Go to Settings > Permalinks
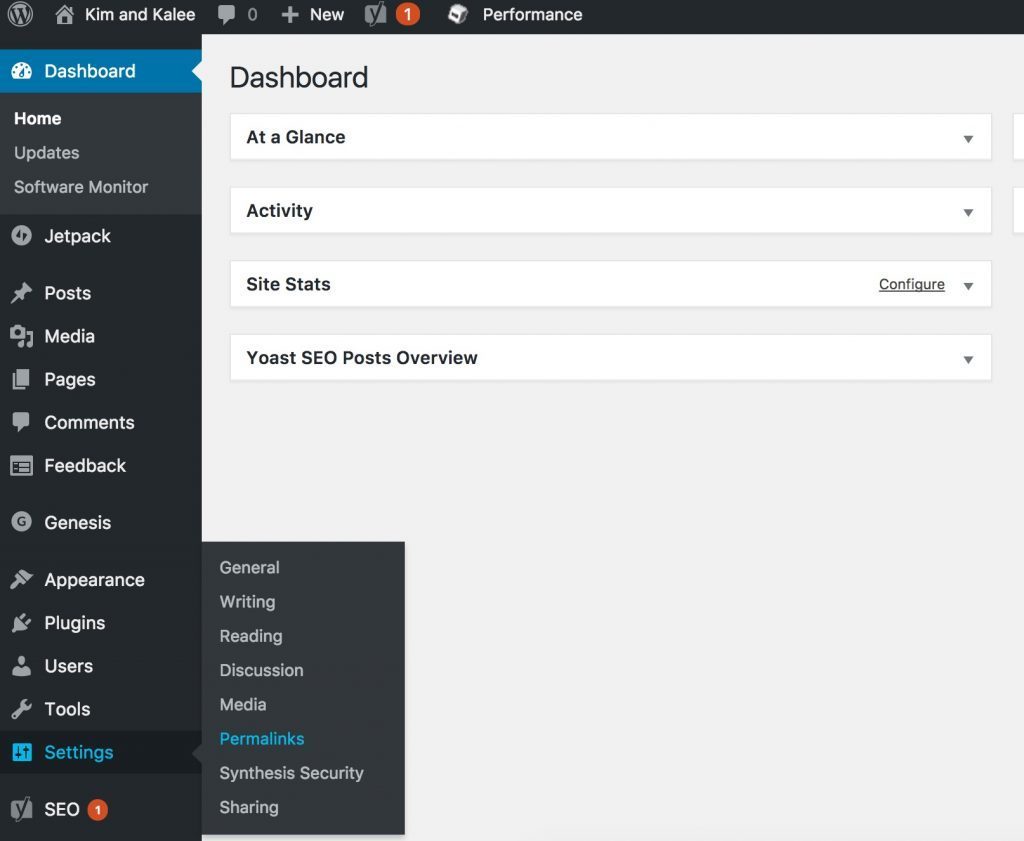
As a general rule, WordPress will default to “plain” which tells your reader nothing about your content.
We want to change this before you create any content on your site so that you don’t have any broken links later.
You’ll see several options to use.
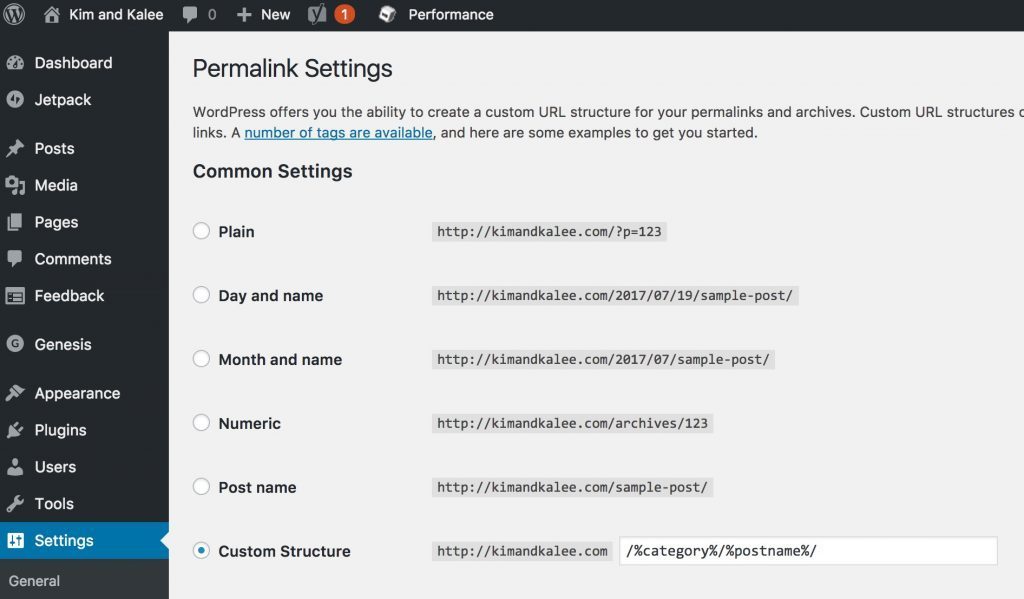
I personally like /%category%/%postname%/ or just /%postname%/.
If you already have content on your site, we do NOT recommend changing your permalink structure without outside tech help. If you were to change it, it could create broken links (aka 404s) which can hurt your blog.

9. Create Your Content Foundation
Before you officially launch your site, there are a few pieces of content you’ll want to have up.
The first 6 pieces to focus on are:
- Home Page
- About Page
- Contact Page
- Privacy Policy
- Widgets
- Menu
Home Page
Some people choose to have a static home page while others will choose to highlight their latest blog posts on it.
We have a mixture of the two using Widgets which are mentioned below. (View our homepage) You can set this up on some themes or hire someone to do this for you.
Benefits of Static Homepage Or Blog Posts
The benefit of a static homepage is that you’re able to present the information you think is the most important first.
The benefit of featuring your latest blog posts are to get more eyes on them!
Setting It Up
Go ahead and peek at how your theme is currently set up. From the WordPress Dashboard, hover over the little house on the top left and click Visit Site.
This will show you how visitors will see your site. Like how it looks? Great! You’re all set.
If you don’t – keep reading.
If you’d like for your homepage to be a static page, you’ll just need to go to Pages > Add New.
Give the page a title and write a few sentences (you can always change it later). Then click Publish.
Now you can make that page your homepage.
From the Dashboard click Appearance > Customize > Homepage Settings > Static Page.
Then click save.
Now you should see the change if you click the little house again and click see Visit Site.
It’s also important to note: As your blog grows, your homepage may not be the page or post people see the most often.
For us, people typically find us on a search engine or Pinterest. So they’re taken to a specific page or post versus our homepage. As your traffic grows, you may see that your homepage isn’t even one of your top ten visited pages!
About Page
Your About Page should be prominent on your site.
We recommend including your:
- mission (what you want to accomplish with your blog or why they should read).
- accomplishments (clients, brand partnerships, etc)
- contact information (email, newsletter, social media channels)
- secret sauce or what makes you and your blog unique
You can also include a link to your favorite posts and a link to your contact page.
Contact Page
Your contact page can be shorter and just include an email and your social media channels.
You can add a few FAQs if you’d like, but it’s not neccesary.
Privacy Policy Page
If you go to Settings > Privacy you can learn more about setting up a privacy policy and even use one that they give you.
As you grow your blog and start monetizing or collecting emails, you will want to update this to share what you’re collecting and how that information is used. But for a blog just starting, typically the provided privacy policy is great to start with!
Your Widgets & Menu
Both Widgets and Menu are under Appearance on your WordPress dashboard.
Your menu will let you set up the links you want featured on each page.
Your widgets allow you to create columns and sections on your site depending on your theme. One reason we suggest a StudioPress theme is because it includes a set-up guide for these or you can hire someone fairly cheap to set them up.
After you get those pieces of content up, you’ll be ready to start creating posts relating to your niche!
Then you can focus on content.
Content can be broken down into 3 pieces:
- Posts
- Cornerstone Content
- Pages
Posts are what you’ll use most of the time. These are the different topics you blog about. Using the Yoast SEO plugin from above will help you write with search engines in mind as well.
Cornerstone Content can be either a page or category. Cornerstone Content is just 1 place where you can find all of the information on a topic that is unlikely to change.
For example, this page is cornerstone content. I may create other posts supporting it, but this is a central piece to our mission and our blog. It also links out to other supporting content.
Pages are a great way to also share evergreen, or unchanging, content. Pages could be your about or contact page, a longer detailed post topic, or a page featuring more posts on a central topic. For example, you could have a Dog Training page that summarizes and links to all of your dog training posts like “How to house train”, “How to crate train” etc.
10. Set Up Your HTTPS
One recent big change to the blogging world is making your site secure. One way to tell if a site is secure is by looking for https:// versus the traditional http:// at the beginning of a domain.
While this may sound technical – it is a free perk of Bluehost! Most of the time, this step will happen even automatically for you!!
So if you logout of your WordPress and type in your domain – you may see http://YourDomain.com or https://YourDomain.com. If you see the https:// version, you’re all set.
If you don’t, it’s simple to set-up.
One reason you might not see it is because Bluehost still is processing your domain. If you see something .bluehost in the URL, it means it’s still processing. I’d just set a reminder to check back in 24 hours and then come back to this step. It may be set up automatically by then.
Setting Up Your HTTPS
Bluehost offers a free SSL certificate for your site, and that’s what will make it secure and give you that little “s” at the end of https://. If your SSL certificate wasn’t automatically added, no worries!
Adding Your Free SSL Certificate:
- Log into your Bluehost control panel.
- Click the Addons tab.
- Find the SSL Certificates, and click learn more.
- Choose get started under WordPress Free SSL.
- Click Install.
That’s it! It may take a couple hours to install and activate so don’t panic if you don’t see it immediately.
If there are any problems -which there shouldn’t be – Bluehost will email you.
Now you’re all set up!!
You’ve literally completed the how to start a blog guide! Now, we’re just sharing a few tips to help you get started making your blog a true business!

11. Decide When You’ll Blog
If you’re wanting to start a blog that makes money, you’ll have to commit to creating high-quality, focused content regularly.
You can choose to blog 1x a month, 1x a week, or even 1x a day. Then main thing is – make it consistent!
As a full-time entrepreneur I blog 2x a week.
While I could say, I’m going to blog 5x a week, I know that’s not realistic. It takes time to create the content.
How Long Does It Take to Create a Blog Post?
Each blog post (typically not this long) takes me about an hour to write and about 30-60 minutes to take pictures for it.
I also promote the blog post on Pinterest and Facebook which is about 15-20 minutes.
You may even decide you want to film a video to go along with all or some of your blog posts.
I’d budget at 1-2 hours for a blog post – especially in the beginning.
One Time Saving Tip
A content calendar – or a list of blog post ideas – really helps me save time. Once a quarter, I’ll sit down and brainstorm ideas I want to blog about. Then, I’ll put them on the calendar.
Amy Porterfield did a great podcast with notes about how to create a content calendar.
Not only will a content calendar save you time, but it helps get the creative juices flowing and can help you create cohesive themes in on your site.
12. Set Up Your Social Media Channels
If you haven’t already, you’ll want to set up your social media channels to match or relate to your blog name.
We recommend going ahead and setting up the following channels to secure your username. Even if you don’t plan on using that social media channel, at least no one else is going to swoop in and use the name you use.
Social Media Channels to Set Up
- Facebook Like Page
- Instagram Business Account (You can convert your personal Instagram as well.)
- Pinterest Business Account
- Youtube
13. Set Up Your Email Service
One of the best ways to connect with your audience and also begin to monetize your site is to create a email list!
We personally use Convertkit as our email service and love the flexibility it offers!
ConvertKit allows us to:
- schedule a newsletter to our subscribers
- create forms for people to sign up for our newsletter
- automatically send emails when someone signs up for an offer
- create a unique form and set of emails for each offer we have
- insert forms right into our posts and pages
Get a Free ConvertKit Trial
Another option is Aweber. It’s a little cheaper and offers the same features as above. It just didn’t feel as user-friendly to us.
Learning How Email Grows Your Traffic & Money-Making Opportunities
Since this is really a guide on how to start a blog, we won’t get into too many email marketing details.
With that said, Chalene Johnson’s Marketing Impact Academy is a great tool for understanding and growing your email list.
3 Common Ways Your Email List Helps Your Blog Make Money
- Sell a product (like an ebook, clothing, or an online course) to subscribers
- Link to affiliate products you love (you’ll make a percentage for each sale)
- If you put ads on your website, you can draw people to your site and make money off your overall traffic
14. Set Up Your Custom Email
For under $20 a month, you can set up a custom Gmail using your domain name. For example, our email is team@kimandkalee.com.
Yes, it’s one more thing to set-up, but if you’re wanting your blog to make money this is an essential step. When it comes down to a brand wanting to work with you or another blogger, they will likely pick the more professional looking email address.
It really comes down to this:
Which would you prefer to work with sparkleprincess411@emailservice.com or team@kimandkalee.com?
If having a blog that makes money is important to you, this is another simple process. It’s also free for 14 days!
Setting Up Your Custom Email Through Gmail
- You should already have your custom domain from setting up your blog.
- Go to the Google Apps site here.
- Click Get Started and enter your information for the account.
- Next, you’ll be able to choose from “Express” or “Custom” way. I suggest Express.
- Now you’ll need to “verify” your domain name. The simplest way to do this is to chose the “insert an HTML tag into your site’s home page” (It’s not too hard; if you can copy & paste you can do this!!) You’ll just copy the code they give you into the <head> section of your website. If you’re using a Studiopress theme, you’ll go to Genesis > Theme Settings > Header. Just paste that code in the <head> part.
- Click “verify.” That’s the hardest part!
- Once you’ve done that, you’ll login to your Google Apps account and click “Users.” Each user is the custom email address! It’s $5 per user per month right now.
- All done! Hurrah!!
Conclusion
Not only have you learned how to set up your blog, but you’re well on your way to becoming an authority online!
Take a moment to pat yourself on the back! Most people won’t even start a blog because the fear of not knowing how paralyzes them.
Not only have you pushed past that, but you’ve created such a strong foundation for yourself!
You are in the top 2% pursuing what they really want, and we’re so happy we’ve been able to be apart of your learning process!
We’d love to check out your blog once you have it up! Just drop a comment below, and we’ll check it out!!
